Getting Started with GitHub Copilot
A practical step-by-step guide to setting up GitHub Copilot, choosing the right tools and models, and writing effective prompts.
Step 1: Getting a GitHub Copilot License
Before you can use GitHub Copilot, you need an active subscription tied to your GitHub account.
Free Tier
GitHub offers a free tier of GitHub Copilot for individual developers. It includes a limited number of completions and chat messages per month, which is a good way to try things out before committing to a paid plan.
To activate it:
- Go to github.com/settings/copilot
- Select the Free plan
- Follow the setup instructions
Paid Plans
If you need unlimited usage or enterprise features, GitHub offers several paid tiers:
- Pro - Unlimited completions and chat for individual developers
- Business - Organization-level management, policy controls, and IP indemnity
- Enterprise - Everything in Business plus knowledge bases, fine-tuning, and advanced admin controls
If your organization already has a GitHub Copilot Business or Enterprise agreement, ask your IT administrator to assign you a seat. You will receive a notification on GitHub once your seat is ready.
For a detailed comparison of what each plan offers, including specific features and capabilities, check out the GitHub Copilot Features overview.
Verifying Your License
After activating your subscription, visit github.com/settings/copilot to confirm your plan is active. You should see your current plan and usage details on this page.
Step 2: Install Your Favorite IDE
GitHub Copilot works across a range of popular IDEs and editors. Pick the one you are most comfortable with - or try VS Code if you are not sure where to start.
Supported IDEs
GitHub Copilot is available in the following editors:
| IDE | Copilot Chat | Agent Mode | Code Completions |
|---|---|---|---|
| Visual Studio Code | ✅ | ✅ | ✅ |
| Visual Studio | ✅ | ✅ | ✅ |
| JetBrains IDEs (IntelliJ, PyCharm, WebStorm, Rider, etc.) | ✅ | ✅ | ✅ |
| Neovim | ❌ | ❌ | ✅ |
| Vim | ❌ | ❌ | ✅ |
| Xcode | ✅ | ❌ | ✅ |
| Eclipse | ✅ | ❌ | ✅ |
For JetBrains IDEs, install the GitHub Copilot plugin from the JetBrains Marketplace. For Visual Studio, Copilot is built-in starting from Visual Studio 2022 17.10+. For Neovim and Vim, install the github/copilot.vim plugin. For Xcode, install GitHub Copilot for Xcode. For Eclipse, install the GitHub Copilot plugin from the Eclipse Marketplace.
Our Recommendation: Visual Studio Code
Visual Studio Code (VS Code) is the recommended editor for GitHub Copilot. It consistently receives the latest Copilot features first, has the deepest integration with GitHub Copilot Chat and Agent Mode, and benefits from the largest ecosystem of extensions.
Why VS Code?
- First-class Copilot support - New features like Agent Mode, multi-file editing, and MCP servers land in VS Code before other editors
- Built-in Copilot Chat - Ask questions, generate code, and get explanations directly in your editor
- Extension ecosystem - Thousands of extensions that complement your Copilot workflow
- Lightweight and fast - Works on Windows, macOS, and Linux without heavy resource usage
- Free - VS Code is completely free and open source
Installing VS Code
- Download VS Code from code.visualstudio.com
- Run the installer for your operating system
- Open VS Code and sign in with your GitHub account (click the account icon in the bottom-left corner)
- The GitHub Copilot extension is built-in as of recent VS Code versions - no separate extension install needed
- Verify Copilot is active by checking for the Copilot icon in the status bar
Keep VS Code Updated
GitHub Copilot features are tightly coupled with VS Code releases. VS Code now ships updates on a weekly cadence, introducing new features and bug fixes at a very high frequency. Enable auto-updates or manually check for updates regularly via Help > Check for Updates.
Fokko Veegens tracks the most important VS Code updates and what they mean for your Copilot experience on our VS Code Updates page.
Step 3: Choosing the Chat Mode
GitHub Copilot in VS Code offers different chat modes that determine how Copilot interacts with your codebase. Picking the right mode for your task is important.

You can switch between modes using the mode picker at the top of the Copilot Chat panel, as shown in the screenshot above.
Ask Mode
Use Ask mode when you want to ask questions or get explanations without Copilot making any changes to your code. This is great for:
- Understanding how a piece of code works
- Getting explanations of error messages
- Learning about a framework or library
- Exploring design options before committing to an approach
Ask mode is read-only - Copilot will answer your questions but will not modify any files.
Agent Mode
Use Agent mode when you want Copilot to actively make changes to your codebase. This is the most powerful mode and is ideal for:
- Implementing new features across multiple files
- Refactoring existing code
- Writing tests
- Fixing bugs that require code changes
- Any task where you want Copilot to read files, run terminal commands, and edit code autonomously
Agent mode can use tools like MCP servers, run terminal commands, and make multi-file edits. This is the mode you will use most for hands-on development work.
Plan Mode
Use Plan mode when you want Copilot to think through a complex task before writing any code. Plan mode creates a structured plan that you can review and approve before execution. This is useful for:
- Large features that span many files
- Tasks where you want to review the approach before any changes are made
- Complex refactoring where understanding the full scope is important
- When you want to break a big task into manageable steps
Which Mode Should I Use?
| Situation | Recommended Mode |
|---|---|
| “How does this function work?” | Ask |
| “Add input validation to this form” | Agent |
| “Refactor the entire auth module” | Plan (then Agent) |
| “What does this error mean?” | Ask |
| “Write tests for the user service” | Agent |
| “Redesign the database layer” | Plan |
Step 4: Choosing the Right Model
GitHub Copilot gives you access to multiple AI models, each with different strengths. Choosing the right model for your task can make a big difference in the quality and speed of the output.
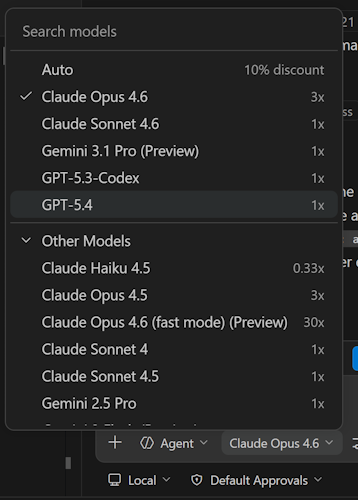
You can switch between models using the model picker button in the chat input area, as shown above.
Premium Requests
GitHub Copilot uses a system of premium requests to manage access to different models. Each plan includes a monthly allowance of premium requests, and different models consume these at different rates through a multiplier.
Some models are included at no extra cost (0x multiplier, meaning free), while more powerful models count as premium and use a higher multiplier. For example, a model with a 3x multiplier means one request uses 3 premium requests from your allowance. Understanding this helps you balance quality with budget.
Model Comparison
Here is an overview of the most relevant models available in GitHub Copilot:
| Model | Best For | Speed | Quality | Multiplier |
|---|---|---|---|---|
| GPT-4.1 | General coding, solid all-rounder | Fast | High | 0x (free) |
| GPT-5.4 | Advanced reasoning, complex problem solving | Moderate | Excellent | 1x |
| Claude Sonnet 4.6 | Complex coding, best balance of speed and quality | Moderate | Excellent | 1x |
| Claude Opus 4.6 | Hardest tasks, large refactors, architecture | Slow | Best | 3x |
| Gemini 3.1 Pro | Long context, multi-file analysis | Moderate | Very high | 1x |
Multipliers are subject to change. Check GitHub's documentation for the latest rates.
Tracking Your Premium Request Usage
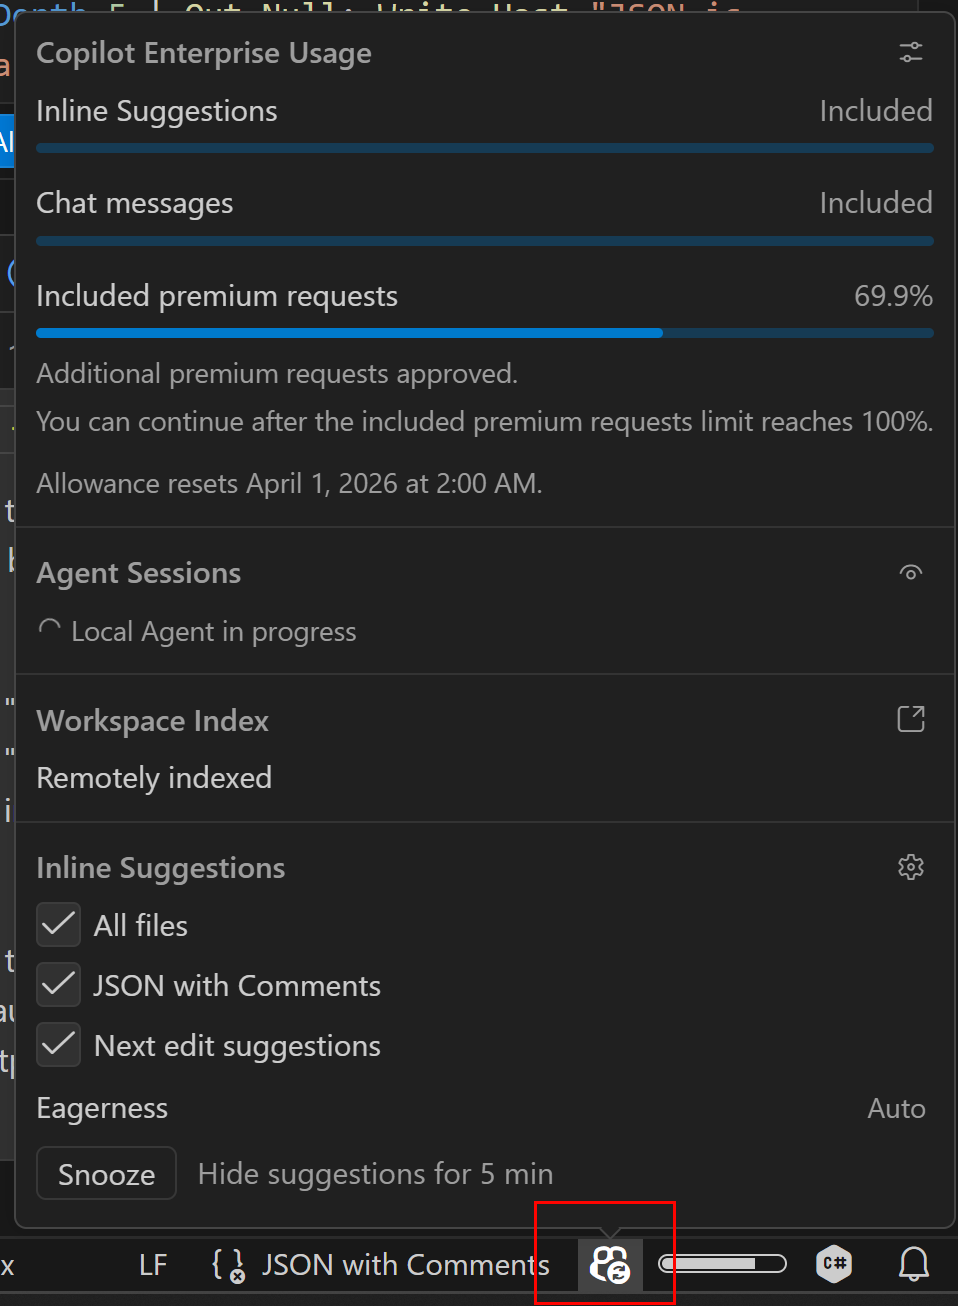
You can track how many premium requests you have used directly in VS Code, as shown above. This helps you stay aware of your usage and make informed decisions about which models to use for each task.
Recommended Models by Task
For everyday coding tasks - Use Claude Sonnet 4.6 (or the latest Sonnet version). This model offers an excellent balance of speed, accuracy, and cost at a 1x multiplier. It handles code generation, refactoring, debugging, and explanations well. This should be your default choice for most development work.
For complex or high-stakes tasks - Use Claude Opus 4.6 when you need the highest quality output. Opus is slower and costs 3x premium requests per use, but it excels at complex architectural decisions, large-scale refactoring across many files, subtle bugs that require deep reasoning, and tasks where getting it right the first time matters most.
For quick questions and simple edits - GPT-4.1 has a 0x multiplier (free) and works well for simple questions, formatting changes, or straightforward code generation where speed matters more than depth. This makes it an excellent choice for everyday tasks where you want to conserve premium requests.
General Advice
- Start with Claude Sonnet 4.6 for most tasks - it is the best all-rounder for coding
- Switch to Opus when you notice Sonnet struggling with complexity
- Use GPT-4.1 for quick lookups and simple tasks to save premium requests
- Experiment with different models to develop a feel for their strengths
Step 5: Writing Effective Prompts
How you phrase your request to Copilot directly impacts the quality of what you get back. Here are practical tips for writing prompts that produce better results.
Be Specific
Vague prompts produce vague results. Compare:
- Vague: “Make this better”
- Specific: “Refactor this function to use early returns instead of nested if-else blocks, and add input validation for the
emailparameter”
The more specific you are about what you want, the closer the output will match your expectations.
One Task at a Time
Do not try to accomplish too many things in a single prompt. Instead of asking Copilot to “refactor the auth module, add tests, update the API docs, and fix the login bug”, break it down:
- First prompt: “Refactor the auth module to use the repository pattern”
- Second prompt: “Write integration tests for the refactored auth module”
- Third prompt: “Update the API documentation to reflect the new auth endpoints”
Each focused prompt gives the model a clear objective and produces more reliable results.
Provide Relevant Context
If your request depends on specific information that Copilot might not have, include it. VS Code Copilot Chat offers several ways to pull in context:
#references - Use#file,#selection,#editor,#terminalLastCommand, or#codebaseto attach specific context to your prompt. For example: “Looking at #file:src/auth/middleware.ts, add rate limiting”/commands - Use commands like/explain,/fix,/tests, or/docto tell Copilot exactly what kind of action you want- Manual context - Mention constraints (“This needs to work with Node.js 18 and Express 4”) or describe the environment (“This runs in a Docker container with limited memory”)
The more relevant context Copilot has, the better its suggestions will be.
Review and Iterate
Treat Copilot's output as a starting point. Read what it produces, test it, and ask for adjustments:
- “This is close, but change the error handling to throw custom exceptions instead of returning null”
- “Good, now add edge case handling for empty arrays and null inputs”
Iterating on the output is faster and more effective than trying to write the perfect prompt on the first try.
Use Few-Shot Prompting When Needed
Few-shot prompting means providing examples of the input/output pattern you want. While you often do not need this with Copilot - it already understands most code patterns - there are cases where examples genuinely help:
- Custom data transformations - When the mapping between input and output is not obvious, showing one or two examples can be much clearer than describing the rules
- Specific formatting patterns - When you need output to match a very particular structure that is hard to describe in words
- Domain-specific conventions - When there is a non-standard pattern unique to your project
For most everyday coding tasks, a clear description is enough. But when the pattern is complex or non-obvious, do not hesitate to include an example.
Specify the Output Format
If you need the response in a particular format, say so explicitly:
- “Return the result as a markdown table with columns for Name, Type, and Description”
- “Write this as a numbered step-by-step guide”
- “Give me just the code, no explanations”
- “Explain this in plain language, avoid technical jargon”
Step 6: Custom Instructions with AGENTS.md and copilot-instructions.md
One of the most powerful ways to improve GitHub Copilot's output is by providing it with custom instructions. These are files in your repository that tell Copilot about your project's conventions, architecture, and preferences.
AGENTS.md (Recommended)
The AGENTS.md format is our recommended approach for repository custom instructions. Unlike other instruction formats, AGENTS.md files are not GitHub Copilot-specific - they follow an open standard that works across different AI tools and agents. This makes them a more natural and portable way to document your project's conventions.
You can place AGENTS.md files at different levels in your directory tree to provide context scoped to specific parts of your codebase:
- Root
AGENTS.md- Project-wide instructions, build commands, and workflow steps src/AGENTS.md- Source code conventions and patternssrc/api/AGENTS.md- API-specific rules and endpoint patternstests/AGENTS.md- Testing strategies, frameworks, and patterns
When Copilot (or any compatible AI agent) is working in a directory, it reads all AGENTS.md files from the root down to the current directory, building up a layered context. The nearest file takes precedence, allowing you to override general instructions with more specific ones.
Enabling AGENTS.md Support in VS Code
To make sure VS Code picks up your AGENTS.md files, you need to enable the following settings in your VS Code configuration (Settings JSON):
{
    "chat.useAgentsMdFile": true,
    "chat.useNestedAgentsMdFiles": true
}
The first setting enables AGENTS.md support in general, and the second ensures that VS Code also reads AGENTS.md files in subfolders, not just the root. Without these settings, your carefully crafted instructions may be ignored.
copilot-instructions.md
In addition to AGENTS.md, it is a good idea to have a .github/copilot-instructions.md file in your repository. This file is automatically included as context for every Copilot Chat conversation in that workspace and is the official GitHub Copilot mechanism for repository-wide instructions.
A practical approach is to keep your .github/copilot-instructions.md lightweight and have it point towards your AGENTS.md files:
# Copilot Instructions

This repository uses AGENTS.md files for detailed instructions.
See the root AGENTS.md for project-wide guidelines and check
for nested AGENTS.md files in subdirectories for domain-specific rules.

- Always read the relevant AGENTS.md files before making changes
- Follow the coding conventions described in src/AGENTS.md
- Follow the testing patterns described in tests/AGENTS.md
GitHub also supports path-specific instructions via .github/instructions/NAME.instructions.md files with applyTo frontmatter for targeting specific file patterns.
Tips for Writing Good Instructions
- Be specific and concrete - “Use
camelCasefor variables” is better than “follow naming conventions” - Include examples of what you want and what you do not want
- Keep instructions focused and organized by topic
- Update instructions as your project evolves
- Do not repeat information that Copilot can infer from your code
Step 7: Managing Your Context Window
Every AI model has a limited context window - the amount of text it can “see” at once. As your conversation grows longer, the model may start losing track of earlier details or produce lower quality responses. Managing your context window is one of the simplest ways to get better results.
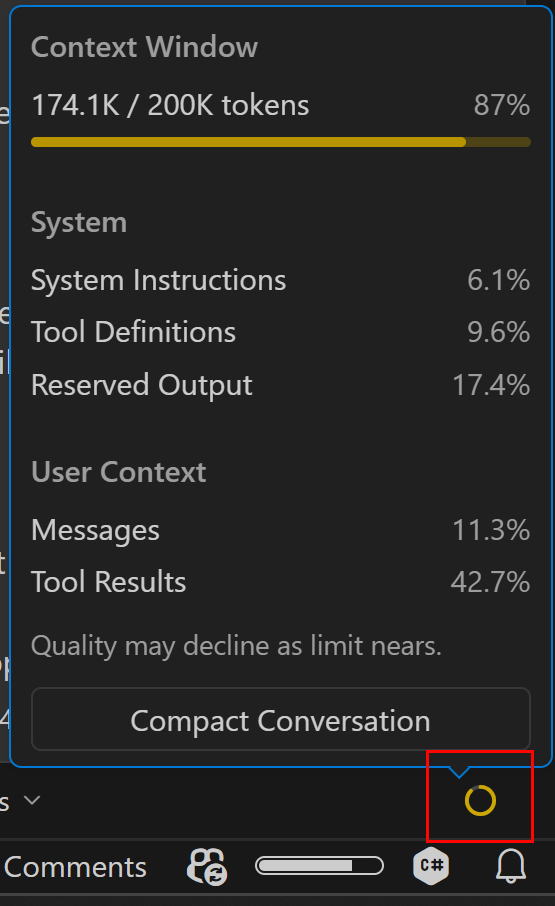
VS Code shows you how full your context window currently is, as shown in the screenshot above. Keep an eye on this indicator - when it fills up, it is time to start a new chat.
Start Fresh for New Topics
When you move on to a different task or topic, open a new chat window instead of continuing in the same one. This gives the model a clean slate with its full context window available.
In VS Code, you can start a new chat by:
- Clicking the + button in the Copilot Chat panel
- Using the keyboard shortcut Ctrl+L (or Cmd+L on macOS)
When to Start a New Chat
- You are switching to a completely different feature or file
- The conversation has gone on for many back-and-forth exchanges
- The model seems to be “confused” or repeating itself
- You want to try a different approach from scratch
- The context window indicator shows it is getting full
Keep Conversations Focused
Each chat session should ideally focus on one task or closely related set of tasks. A conversation about setting up authentication should not drift into database schema design - start a new chat for the new topic.
This habit alone can noticeably improve the consistency and accuracy of Copilot's responses.
Step 8: Setting Up the Context7 MCP Server
Context7 is a Model Context Protocol (MCP) server that provides up-to-date library documentation directly to GitHub Copilot. This is important because AI models are trained on data that can become outdated - Context7 fixes this by fetching the latest docs on demand.
What Is MCP?
The Model Context Protocol (MCP) allows AI assistants to connect to external data sources and tools. Think of MCP servers as plugins that extend what Copilot can do. Context7 is one of the most useful MCP servers for development work.
Setting Up Context7
- Create a
.vscode/mcp.jsonfile in your workspace root (or your home directory for global configuration) - Add the Context7 MCP server configuration:
{
    "servers": {
        "context7": {
            "type": "stdio",
            "command": "npx",
            "args": ["-y", "@upstash/context7-mcp"]
        }
    }
}
- Restart VS Code to activate the MCP server
- In Copilot Chat (Agent Mode), you can now ask Copilot to look up the latest documentation for any library
Using Context7
Once configured, Copilot's Agent Mode can automatically use Context7 when it needs documentation. You can also explicitly ask it to consult documentation:
- “Use context7 to look up the latest React Router v7 docs”
- “Check the current API for ASP.NET Core minimal APIs using context7”
This is especially useful when working with frameworks that update frequently, as it ensures Copilot gives you advice based on the current version rather than potentially outdated training data.
Step 9: Helpful Resources
Beyond the basics covered in this guide, there are many tools, extensions, and resources that can enhance your GitHub Copilot experience. We have listed a few of the most helpful ones below.
Join Our Discord Community
If you have questions, want to share tips, or need help with GitHub Copilot, join our Discord server. There are a bunch of very experienced GitHub Copilot users and trainers there who will try to help out.
The GitHub Copilot Handbook
For a comprehensive deep-dive into GitHub Copilot, check out The GitHub Copilot Handbook. It covers advanced topics, real-world workflows, and practical advice for getting the most out of Copilot in your daily work.
Context7 and MCP Servers
As covered in Step 8, Context7 is one of the most useful MCP servers for keeping your AI assistant up to date with the latest library documentation. But Context7 is just one example - the MCP ecosystem is growing rapidly with servers for databases, APIs, cloud services, and more. Explore what is available and set up the ones that match your workflow.
Tool Tips and Extensions
We maintain a curated collection of useful VS Code extensions, tools, and resources that complement GitHub Copilot. These include productivity boosters, code quality tools, and extensions that integrate well with AI-assisted development.
Check out the GitHub Copilot Tool Tips page for the full list.
Understanding Generative AI
If you want to understand how the AI models behind GitHub Copilot actually work - including concepts like large language models (LLMs), tokens, temperature, and context windows - we have a dedicated resource for that.
Visit GenAI Basics for an accessible explanation of the fundamentals of generative AI and how they apply to your daily development work.
Step 10: Build a Game!
A surprisingly fun way to experience the power of GitHub Copilot is to build a game from your childhood. Just open a new chat, describe the game you want to create, and see how far you can get.
Our experience is that people are often surprised by what they can achieve in just a few hours of prompting - even without deep game development experience. GitHub Copilot handles a lot of the heavy lifting, from setting up the game loop to rendering graphics and handling user input.
Ideas to Get You Started
- Start simple - Build a classic like Tic-Tac-Toe or Snake. These are straightforward enough to get a working version quickly, and you can iteratively add features like score tracking, AI opponents, or animations.
- Go retro - Try recreating Super Mario, Pac-Man, or Tetris. You will be amazed at how much Copilot can generate for platformer physics, collision detection, and level design.
- Go big - Feeling ambitious? Try a 3D game like a Doom-style first-person shooter or a Minecraft-like voxel world. Modern web technologies like WebGL and Three.js make this surprisingly accessible, and Copilot can help you navigate the complexity.
The goal is not to ship a polished product - it is to experience firsthand how AI-assisted development changes what is possible. Set the bar wherever feels right for you and just start prompting. You might surprise yourself.
Step 11: Next Steps
Now that you have the fundamentals down, there is a whole world of advanced GitHub Copilot capabilities waiting to be explored. Here are some powerful features worth looking into as you continue your journey.
Reusable Prompts
Reusable prompts (.prompt.md files) let you save commonly used instructions as templates that you can invoke by name in Copilot Chat. Instead of typing the same detailed prompt every time, you create it once and reuse it across your team. Great for standardizing code reviews, commit messages, or scaffolding patterns.
GitHub Copilot CLI
GitHub Copilot extends beyond the editor into your terminal. The GitHub Copilot CLI helps you compose complex shell commands, explains what a command does before you run it, and can suggest the right flags and options for tools you rarely use. If you ever find yourself searching for “how to do X in git” or “tar syntax”, Copilot CLI has you covered.
GitHub Copilot Coding Agent
The Copilot Coding Agent takes things a step further by autonomously working on GitHub Issues. Assign an issue to Copilot and it will create a branch, write the code, run tests, and open a pull request - all without you having to open an IDE. It is ideal for well-defined tasks like bug fixes, small features, and routine changes.
GitHub Copilot Review Agent
The Copilot Review Agent automatically reviews pull requests on GitHub, providing feedback on code quality, potential bugs, and adherence to best practices. It acts as an always-available first reviewer, catching issues early before human reviewers look at the code.
Custom Agents
Custom agents (.agent.md files) let you define specialized AI personas tailored to your project or domain. Each agent can have its own set of instructions, tools, and constraints. For example, you could create a “security reviewer” agent that focuses exclusively on finding vulnerabilities, or a “docs writer” agent that follows your documentation style guide.
Sub Agents
Sub agents allow a primary agent to delegate specific subtasks to other agents during a conversation. This enables complex, multi-step workflows where each step can be handled by a specialist. Think of it as building a team of AI collaborators that work together on your behalf.
Agent Types
VS Code supports different agent types depending on the level of control you need. Prompt-based agents use a markdown file to define behavior, while code-based agents (VS Code extensions) offer full programmatic control with custom tool implementations and UI integration. Choose the type that matches the complexity of what you want to build.
We are Here to Help
These topics can feel overwhelming at first, but you do not have to figure them all out at once. Pick what interests you, experiment, and reach out if you get stuck. Drop by our Discord community or check out The GitHub Copilot Handbook for deeper guidance. We are happy to help!